
Opinions differ on the correct sequence from cleaning to seating the bullet. In this blog article, we would like to explain what we believe is the correct order.
We won't cover measuring in this article. There are of course additional steps that can be added in between, some of which we discuss at the bottom of the article.
1. Removing the primer
The first step after firing the cartridge is, in our opinion, removing the primer with a universal decapping die or a hand depriming tool. When the primer is removed first, the primer pocket can be cleaned with a primer pocket brush. This can be done manually or with a motorized case prep station. The final residue can then be cleaned and polished in a tumbler.
2. Cleaning and polishing the brass
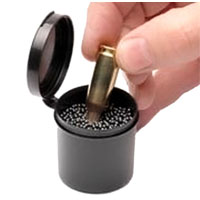
After removing the primer and cleaning the primer pocket, the cases go into a tumbler. We are in favor of a wet tumbler filled with water, stainless steel media, and a polishing solution. This method releases no toxic substances into the room and the result is that your cases look like new again. After the cases have tumbled for several hours, you need to separate the stainless steel media from the cases, which can be done with a brass centrifuge.
3. Inspecting the cases for damage
Especially when the cases have been reloaded several times, it is extremely important to inspect them for damage. Pay particular attention to (hairline) cracks.
4. Drying the brass
Drying the cases is obviously important, as you don't want to pour powder into a wet case. Drying can be done on a rack, or what we do ourselves is use a brass dryer. The cases are dry within an hour, as hot air is blown through the unit. Our brass dryers can hold approximately 1000 .223 Remington cases and over 500 .308 cases.
5. Annealing the brass (optional)
Opinions on annealing are divided, however we recommend it and this step should not be forgotten in our view. When firing cartridges, high temperatures are released. These high temperatures cause the brass material of the case to work-harden. When material becomes harder, it breaks more easily, and since a case is reformed with each round, this has negative effects. Think of a paperclip that is bent several times; eventually, the paperclip will break. This is what also happens to your cases.
Besides making cases last longer, there is another advantage. This is especially interesting for shooters who want to extract every bit of precision. When cases are not annealed, the material springs back minimally after resizing the neck and shoulder. This means that, for example, shoulder bump cannot be done accurately. It also affects the use of an expander mandrel; the neck diameter can spring back slightly, making the neck tension inaccurate.
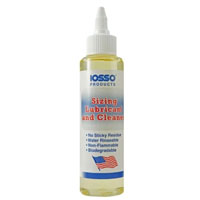
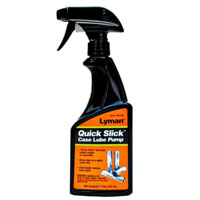
6. Applying case lube to the brass
As preparation for properly resizing the cases (steps 7 and 8), the cases are treated with case lube. Case lube is a lubricant that ensures the cases can be smoothly resized to the correct dimensions suitable for the chamber. What we find convenient is putting a large batch of cases, for example 200, in a bag and spraying case lube spray into the bag. Move the cases carefully through the bag so the case lube can reach everywhere, both the outside of the case and the inside of the neck. With this method, it is important that the cases are cleaned again after sizing.
Another method is using a lube pad. You put some case lube on the pad and roll the cases over it, for example a row of 5 to 10 cases, depending on the caliber and size of the lube pad. With this method, the inside of the neck needs to be lubricated separately. This can be done by dipping the neck in a dry lube media, for example the Redding dry lube. Another option is to apply case lube with a cotton swab, however removing case lube from the inside of the neck is not always convenient. A minimal layer of lube will remain, which can cause powder kernels to stick in the neck.
 |  |  |  |
7. Full length sizing
After cleaning and annealing the cases, it's time to resize them using a full length sizing die. The name says it all; the case is completely resized, including the neck, shoulder, and body. You can also use a full length sizing die with an internal expander mandrel, however we do this separately in the next step.
8. Expanding mandrel - neck tension
We choose to use a separate expander mandrel to determine the correct neck tension. Typically, the ideal neck tension is between 0.001" and 0.002" (thousandths).
With an expander mandrel, you push a mandrel through the neck of the case. The mandrel has a slightly smaller diameter than the final bullet that will be seated in the neck. If you take a .30 caliber bullet with a diameter of 0.308" and you want 0.001" neck tension, the expander mandrel will have a diameter of 0.307". The expander mandrel also ensures precise roundness of the neck, resulting in precise concentricity.
9. Second cleaning to remove case lube
When the cases are fully covered with case lube, they need to be cleaned again. Polishing is not necessary; this is purely about degreasing the case lube. This can be done in a tumbler but also in an ultrasonic cleaner.
10. Second drying
Fortunately, we don't need to explain this to you anymore; you already know exactly how to do this!
11. Case trimming and chamfering
Due to repeated resizing, cases become longer until they no longer fit properly in the chamber. After a number of firings, it is probably necessary to trim a bit off the case mouth. In this step, we also create a small chamfer on the inside and outside of the case mouth. Both processes can be done manually or with a machine.
12. Seating the primer is the third-to-last step
Now it's time to seat the primers. Seating primers can be done with a hand priming tool, bench top primer seater, or a primer seater in your reloading press, such as the PCPS from Derraco.
13. Charging the cases with powder - Almost there!
As the second-to-last step, we're going to charge the cases with powder. Have your notes or the manual that came with your powder container ready and carefully weigh the correct charges. Using a funnel, you fill the cases with the correct charge. For weighing powder, you can use a digital precision scale or an automatic trickler. When using a precision scale, it's handy to use a manual trickler for the final grains.
14. Seating the bullet with a seater die
The most enjoyable step in the entire ammunition reloading process is, for us, seating the bullet. Seating the bullet can be done in two ways.
- Using a seater die in the reloading press.
- Using an "inline" seating die, the most precise way to seat the bullet. A different press is required for this die, an arbor press. A well-known model is the K&M arbor press. The most commonly used seating dies are those from L.E. Wilson & Sinclair.
Additional steps for fine-tuning precision ammunition
Flash hole reamer
- With a flash hole reamer or uniformer, the hole between the primer pocket and the powder chamber of the case is slightly reamed so that the hole becomes identical for every cartridge. You can do this once with new cases. In between, you can of course still clean it with a flash hole cleaner when carbon builds up.
Roll sizer
- A roll sizer is used for resizing the lower part of the case, the part that a full length sizing die just doesn't reach. A roll sizer thus ensures that the case is straight over its entire length. Roll sizers are commonly used for pistol and revolver ammunition and more recently also for rifle ammunition.
Meplat trimming
- Meplat trimming is trimming the bullet tip. There is minimal tolerance present in bullets; with a meplat trimmer, this tolerance can be reduced. We ourselves are not yet certain whether this has positive effects, however every little bit helps with this hobby. "If it doesn't help, it doesn't hurt."
Measuring
- Continuous measuring is of great importance, both for safety and precision. Think of setting back the shoulder and neck, neck tension, seating depth, concentricity, and the total length of the case and cartridge. And so on. There's a separate article to write about it, and we're going to do that!